The digit 7 Segment Display, this screen is used to display numbers, letters, and symbols. In this post, we’ll discover how to use digit 7-segment LED display with Arduino.
Electronic components that we need:
- Arduino UNO
- Breadboard
- 7-Segment Display
- 2 resistors 220 Ohm
- Electrical wires
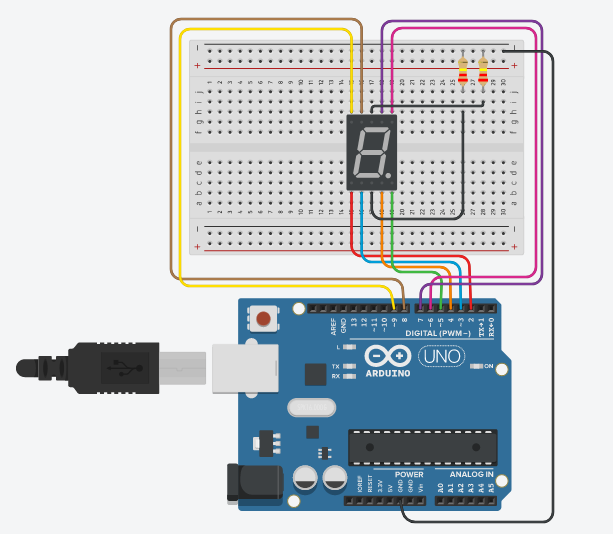
Circuit diagram:
Programming Code:
    int A = 7;
    int B = 6;
    int C = 4;
    int D = 3;
    int E = 2;
    int F = 8;
    int G = 9;
    byte num0 = 0x3F;
    byte num1 = 0x6;
    byte num2 = 0x5B;
    byte num3 = 0x4F;
    byte num4 = 0x66;
    byte num5 = 0x6D;
    byte num6 = 0x7C;
    byte num7 = 0x7;
    byte num8 = 0x7F;
    byte num9 = 0x6F;
    // by www.andprof.com
    void on(byte num){
    int result = bitRead(num, 0);
    if (result == 1)
    {digitalWrite(A, HIGH);}
    else
    {digitalWrite(A, LOW);}
    result = bitRead( num, 1);
    if (result == 1)
    {digitalWrite(B, HIGH);}
    else
    {digitalWrite(B, LOW);}
    result = bitRead( num, 2);
    if (result == 1)
    {digitalWrite(C, HIGH);}
    else
    {digitalWrite(C, LOW);}
    result = bitRead( num, 3);
    if (result == 1)
    {digitalWrite(D, HIGH);}
    else
    {digitalWrite(D, LOW);}
    result = bitRead( num, 4);
    if (result == 1)
    {digitalWrite(E, HIGH);}
    else
    {digitalWrite(E, LOW);}

    result = bitRead( num, 5);
    if (result == 1)
    {digitalWrite(F, HIGH);}
    else
    {digitalWrite(F, LOW);}

    result = bitRead( num, 6);
    if (result == 1)
    {digitalWrite(G, HIGH);}
    else
    {digitalWrite(G, LOW);}
    }
    void setup() {
      // put your setup code here, to run once:
    pinMode(A, OUTPUT);
    pinMode(B, OUTPUT);
    pinMode(C, OUTPUT);
    pinMode(D, OUTPUT);
    pinMode(E, OUTPUT);
    pinMode(F, OUTPUT);
    pinMode(G, OUTPUT);
    pinMode(10,OUTPUT);
    }
    void loop() {
      // put your main code here, to run repeatedly:
    on(num0);
    delay(1000);
    on(num1);
    delay(1000);
    on(num2);
    delay(1000);
    on(num3);
    delay(1000);
    on(num4);
    delay(1000);
    on(num5);
    delay(1000);
    on(num6);
    delay(1000);
    on(num7);
    delay(1000);
    on(num8);
    delay(1000);
    on(num9);
    delay(1000);
    }
Explanatory video: